Blog

  • Weather Alerts Decoded: When to Shelter and Where

    Weather Alerts Decoded: When to Shelter and Where

    Your phone buzzes with a weather alert. Be honest: do you actually know what it means — and what you’re supposed to do? Most people aren’t sure of the difference between a watch and a warning, and even fewer know that the right place to shelter from a tornado is the opposite of the right move in a flood. That confusion isn’t harmless. In severe weather, the few minutes you’d spend figuring out what an alert means and where to go are often the exact minutes that keep you safe. The good news is that the National Weather Service system is far simpler than it looks once you decode it. This guide explains what the words mean, how to make sure alerts actually reach you, and exactly where to shelter for each kind of hazard.

    Watch vs. Warning vs. Advisory: The Three Words That Matter

    Nearly every weather alert is one of three types, and understanding the distinction is the single most useful thing in this entire article. A Watch means be prepared — the conditions are favorable for dangerous weather to develop. Think of it as the ingredients being in place: a tornado, flood, or severe storm is possible in or near the area, which is usually large, covering many counties. A watch isn’t a signal to panic; it’s a signal to review your plan, stay alert, keep an eye on the sky, and be ready to act quickly if things escalate.

    A Warning is the one that demands action. It means the dangerous weather is happening now or about to — spotted by trained observers or detected on radar — and there is imminent danger to life and property in a smaller, specific area. When a warning is issued for where you are, you don’t wait, watch the clouds, or finish what you’re doing. You take protective action immediately. The simplest way to hold the two apart: a watch means the ingredients are there; a warning means it’s actually happening.

    The third word, Advisory, sits below a warning. It signals conditions that are hazardous or highly inconvenient but generally not life-threatening — the kind of weather where you should use caution and adjust your plans, but you’re not in mortal danger. (You may also, very rarely, encounter the word Emergency, as in a Tornado Emergency or Flash Flood Emergency. These are the most dire alerts the Weather Service issues, reserved for catastrophic, confirmed, life-threatening situations — when you see one, act instantly.)

    The Three Words, Decoded

    WATCH — Be Prepared. Conditions are favorable; the hazard is possible. Review your plan and stay alert.

    WARNING — Take Action Now. The hazard is occurring or imminent. Shelter or act immediately.

    ADVISORY — Use Caution. Hazardous but usually not life-threatening conditions. Be careful and adjust plans.

    Make Sure the Alert Actually Reaches You

    An alert can only protect you if you receive it — ideally while you’re asleep, or when the power and cell networks are struggling. That’s why the Weather Service stresses having more than one way to get warnings. Most modern phones automatically receive Wireless Emergency Alerts for serious threats like tornado and flash flood warnings; make sure those notifications are switched on in your settings. Pair that with a NOAA Weather Radio — a battery-powered or hand-crank model that broadcasts directly from the Weather Service and keeps working when the grid and your phone don’t. It’s the backbone of any serious weather-safety setup.

    Round it out with a trusted weather app, the weather.gov site, and local TV or radio. And know the limits of outdoor warning sirens: they are designed to alert people who are outside, and you often cannot hear them indoors, asleep, or over the noise of a storm. Never treat the absence of a siren as the all-clear, and never wait to hear one before acting on an alert you’ve already received. Two independent ways to be warned is the minimum; three is better.

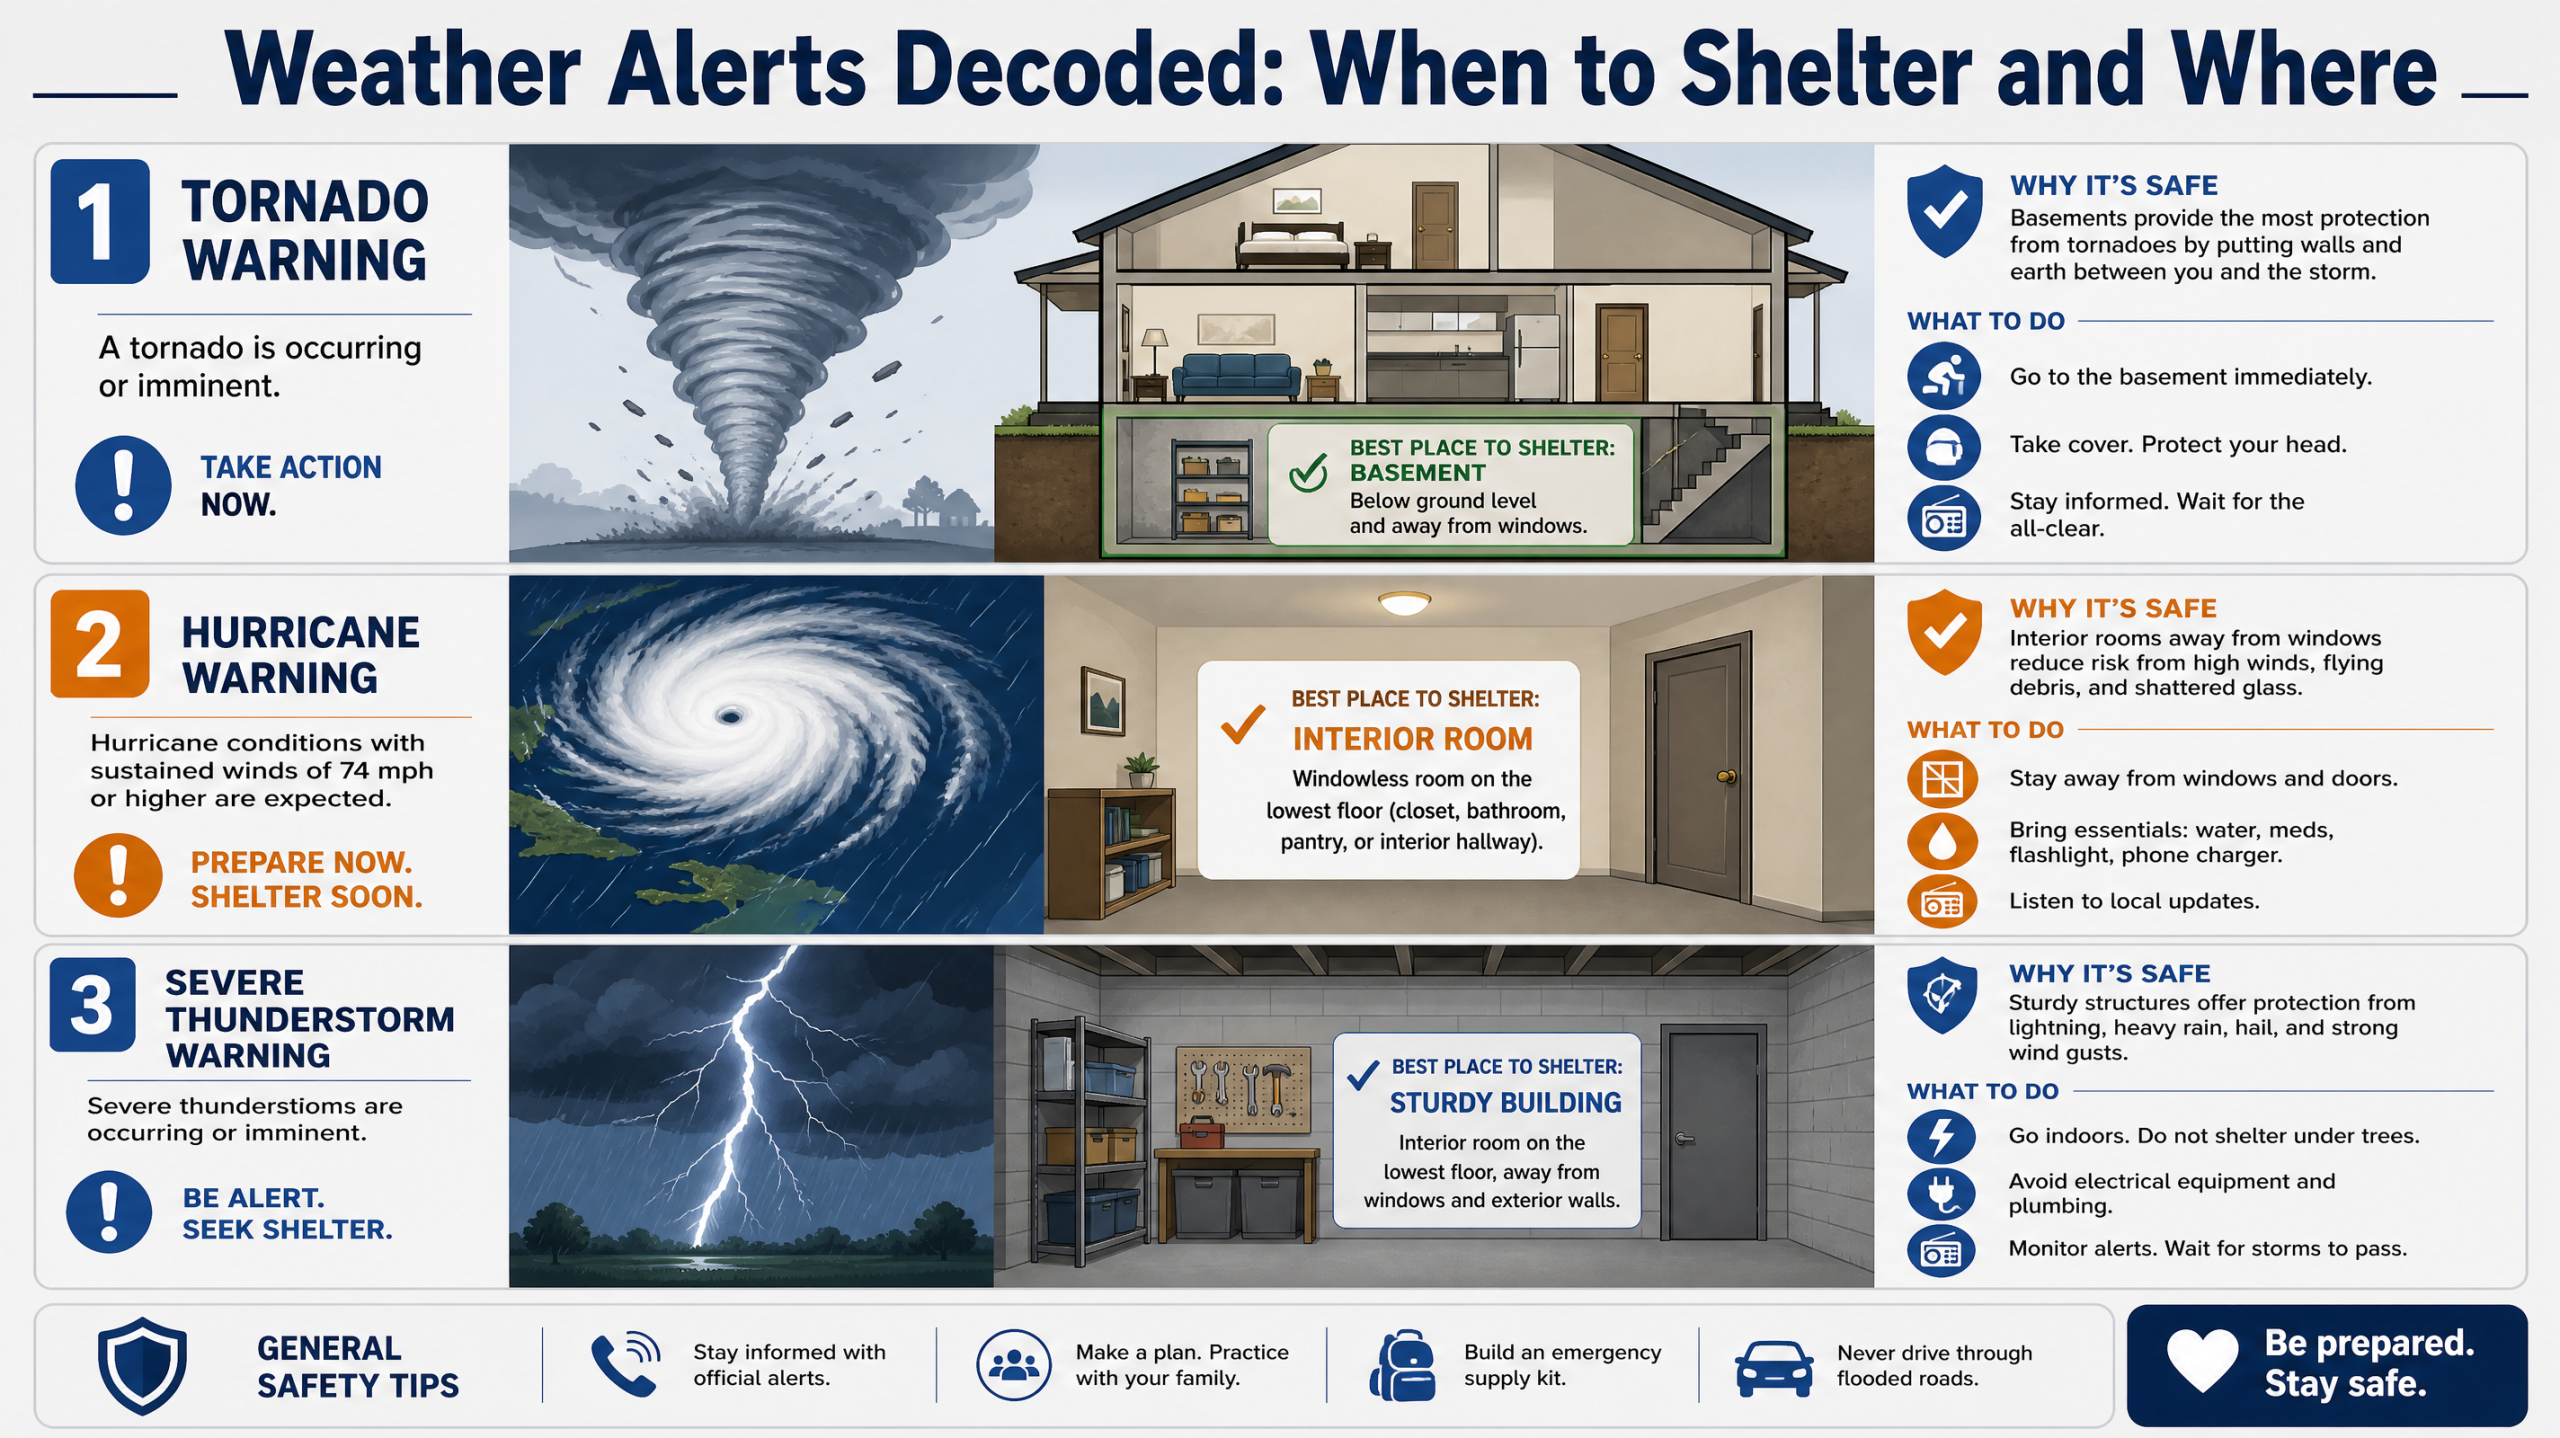
    Where to Shelter: Tornadoes

    When a tornado warning is issued for your location, seek shelter immediately — you may have only minutes. The goal is to put as many walls as possible between you and the outside, as low as possible. Go to the lowest floor — a basement or storm cellar is ideal — and into a small interior room with no windows, such as a bathroom, closet, or center hallway. Crouch down and cover your head and neck with your arms, and add more protection if you can: a heavy blanket, a mattress, or even a bicycle or sports helmet to guard against the flying debris that causes most tornado injuries.

    Some places are dangerous and should be left before the storm arrives. Mobile and manufactured homes are not safe in a tornado, even tied down — have a plan to get to a sturdy building or a designated community shelter while there’s still time. A vehicle offers little protection, and the old advice to hide under a highway overpass is wrong: overpasses can actually funnel and accelerate the wind, and they expose you to debris. If you’re caught driving with no sturdy building nearby, the guidance is difficult but clear — getting to a substantial shelter beats staying in the car, and lying flat in a low ditch away from the vehicle, covering your head, may be safer than an overpass.

    Where to Shelter: Floods and Flash Floods

    Flooding is the deadliest pattern here — flash floods are the number one storm-related killer in the United States — and the shelter rule is the opposite of a tornado’s: instead of going down and in, you go up and out. When a flash flood warning hits, move immediately to higher ground, climbing to safety before rising water can cut off your exit. Get out of low-lying spots, dips, washes, canyons, and anywhere near streams or drainage channels, which can turn from dry to deadly in minutes.

    The most important flood rule of all concerns water you can see on a road: never walk or drive through it. Nearly half of all flash-flood deaths are vehicle-related, almost always because someone believed they could make it across. They couldn’t. Just six inches of moving water can knock an adult off their feet, a foot of water can float many cars, and eighteen to twenty-four inches will sweep away most vehicles, including trucks and SUVs. Worse, the water hides what the flood has done to the road beneath — it may be washed out entirely — along with debris and downed power lines. The Weather Service sums it up in three words worth memorizing: Turn Around, Don’t Drown. If you encounter a flooded road, turn around and find another way, every single time.

    Where to Shelter: Lightning and Severe Thunderstorms

    For lightning, the rule is gloriously simple: When Thunder Roars, Go Indoors. If you can hear thunder at all, you are already close enough to be struck — lightning can reach more than ten miles from the rain, sometimes from a sky that looks clear overhead. At the first rumble, get inside a substantial building (one with wiring and plumbing) or, if none is available, a hard-topped vehicle with the windows up. Carports, open garages, covered porches, picnic pavilions, and tents are not shelter — you need four real walls and a roof.

    Once inside, stay there until 30 minutes after the last clap of thunder — most lightning casualties happen to people who left shelter too early or didn’t take it soon enough. Don’t be fooled when the rain stops; the threat lingers. While indoors, avoid anything that connects to the outside world electrically: stay off corded phones and electronics, away from plumbing like sinks and showers, and back from windows and doors. If you’re caught outside with no shelter at all, get off high ground, away from isolated tall trees, out of and away from water, and put down metal objects — but understand there is no truly safe place outdoors in a storm, which is exactly why getting in early matters so much.

    Where to Shelter: Hurricanes, Winter Storms, and Extreme Temperatures

    A hurricane or tropical storm gives you something the others don’t: days of warning, with watches issued around 48 hours ahead and warnings around 36. Use that time. The most important rule is to follow evacuation orders without hesitation — they’re issued because of storm surge, the wall of seawater that is the deadliest part of most hurricanes, and no house is worth riding it out. If you’re not in an evacuation zone and are sheltering in place, ride out the storm in an interior room on the lowest safe floor, away from all windows, and don’t be lured outside by the eerie calm of the eye, which is only the storm’s halfway point.

    For a winter storm, blizzard, or ice storm, the safest shelter is usually your own home: stay in and stay off the roads, where the real danger lies. Prepare for possible power loss, keep warm with layers while conserving heat, and never use outdoor heat sources indoors. In extreme heat, move to air conditioning or a public cooling center, drink plenty of water, and never leave a child or pet in a parked car; in extreme cold, keep warm, watch for signs of hypothermia, and check that your heat sources are safe. Both temperature extremes are most dangerous to older adults, young children, and the chronically ill.

    Hazard Where to Go
    Tornado Down & in: lowest floor, small interior windowless room; cover head
    Flash flood Up & out: higher ground. Never drive/walk through water
    Lightning Substantial building or hard-topped car; wait 30 min after last thunder
    Hurricane Evacuate if told to; otherwise interior room, away from windows
    Winter storm / extreme temps Shelter in place; off the roads; cooling/warming centers if needed

    Rules That Apply to Every Alert

    Whatever the hazard, a few habits make all the difference. Act early. The deadliest mistake in severe weather is waiting to confirm the danger with your own eyes before responding — by then your safety margin is gone. When a warning is issued, treat it as real and move; it’s always better to shelter for a storm that misses you than to be caught by one that doesn’t. Have a plan before the season starts: know which room is your tornado shelter, where higher ground is, how you’d evacuate, where your family will meet, and who your out-of-area contact is if local phones are jammed.

    Know your local risks, since the threats in tornado country differ from those on a hurricane coast or in a flood-prone valley, and tailor your preparation accordingly. Keep an emergency kit ready — water, non-perishable food, flashlights, a first-aid kit, medications, and that weather radio — so you’re not assembling supplies as the sky darkens. And look out for the people around you: a quick call or knock to a neighbor who is elderly, disabled, or living alone may be the warning they didn’t receive. Decoding the alerts is the first step; the second is simply deciding, in advance, that when one arrives you will act on it without hesitation.

    Know the Word, Know the Move

    A weather alert is only as useful as your ability to act on it — and now you can. A watch means get ready; a warning means go. For a tornado you head down and in; for a flood you go up and out; for lightning you get inside and wait it out; for a hurricane you leave when they tell you to. Those few rules cover the great majority of dangerous weather most of us will ever face.

    Set up two or three ways to receive alerts, make your shelter plan before you need it, and promise yourself one thing: when a warning comes, you’ll move first and second-guess later. The minutes you save by already knowing what the words mean and where to go are the minutes that matter most. Turn around, go indoors, head for higher ground, get to the lowest interior room — whichever the moment calls for, you’ll know it cold.

    Watch means prepare. Warning means act — now.

    This article is for general educational purposes. For authoritative, real-time guidance, see the National Weather Service and Ready.gov, and always follow the instructions of your local officials and emergency managers.

  • Riding Out a Power Outage Safely

    Riding Out a Power Outage Safely

    A power outage is usually just an inconvenience — a few hours of darkness, a scramble for candles, a fridge you’re nervous to open. But here’s the uncomfortable truth that the safety agencies keep repeating: the real dangers of a blackout almost never come from the loss of power itself. They come from the things people do to cope with it. Generators run in garages. Gas stoves lit for warmth. Spoiled food eaten because throwing it out felt wasteful. Every major outage brings a wave of carbon monoxide poisonings, fires, and illness — nearly all of them preventable. Drawing on guidance from Ready.gov, the CDC, and the USDA, this is how to keep an outage exactly what it should be: a temporary inconvenience, and nothing worse.

    Prepare Before the Lights Go Out

    The safest outage is one you’ve already prepared for, and the centerpiece is a simple kit kept somewhere you can find it in the dark. Stock flashlights and a battery or hand-crank lantern — not candles, which are a leading cause of house fires — along with plenty of spare batteries. Keep at least a three-day supply of water (a gallon per person per day) and non-perishable food with a manual can opener, since your electric one won’t work. Add a battery-powered or hand-crank radio to get emergency information, charged power banks for your phones, a first-aid kit, any essential medications, and some cash, because ATMs and card readers go down with the grid.

    A few preparations pay off enormously when an outage actually hits. Keep an appliance thermometer in your refrigerator and freezer so you can judge food safety later by actual temperature, not guesswork. Freeze a few jugs of water and gel packs in advance — they help keep the freezer cold longer and can move to a cooler. Learn how to open your garage door manually, since the automatic opener won’t work. And if anyone in your home relies on power-dependent medical equipment, oxygen, or refrigerated medication, make a backup plan now: a battery or generator source, a cooler for medicines, and a call to your utility, many of which keep a priority list for medically vulnerable customers.

    The Silent Killer: Generators and Carbon Monoxide

    If you remember only one thing from this entire article, make it this. The deadliest hazard of any power outage is carbon monoxide — a colorless, odorless gas that kills people and pets every single year in the aftermath of storms and blackouts. It’s produced by anything that burns fuel: portable generators, charcoal and gas grills, camp stoves, pressure washers, and gas engines of every kind. Because you cannot see it, smell it, or taste it, it can build to a fatal level while everyone inside feels nothing but vaguely unwell — or asleep.

    The rule from the CDC is absolute: never run a generator, grill, camp stove, or any fuel-burning engine inside your home, basement, or garage — or within 20 feet of any window, door, or vent. An open garage door or a cracked window is not enough ventilation; CO seeps and pools, and an attached garage is just an indoor space with a big door. Place the generator well outside and far from the house, using an outdoor-rated extension cord more than 20 feet long to reach it. And equally important: never use a gas stove or oven to heat your home. It’s a top cause of outage carbon monoxide poisoning, and a fire risk besides.

    ⚠ The Carbon Monoxide Rule That Saves Lives

    Generators, grills, and camp stoves go outdoors only — never in a home, basement, or garage, and never closer than 20 feet from any window, door, or vent. Never heat your home with a gas stove or oven. Carbon monoxide is invisible and odorless, and it can kill before you realize anything is wrong.

    Install battery-backup CO alarms on every level of your home — during an outage they’re the only thing that can warn you. If an alarm sounds or anyone feels dizzy, headachy, or nauseated, get everyone to fresh air immediately and call 911.

    Running a Generator Without Getting Hurt

    Carbon monoxide is the biggest generator danger, but not the only one. Never plug a generator into a wall outlet to power your house — a practice called backfeeding. It can send electricity back onto the utility lines and electrocute the line workers trying to restore your power, and it can injure you. Instead, either plug appliances directly into the generator with heavy-duty, outdoor-rated extension cords, or have a licensed electrician install a proper transfer switch if you want to power your home’s circuits.

    A few more habits keep a generator from becoming a hazard in its own right. Keep it dry and protected from rain — touching a wet generator or its connections can cause a severe electric shock — while still keeping it far from the house and well-ventilated. Don’t overload it; add up the wattage of what you plug in and stay within its rated capacity. And always let the engine cool before refueling, because gasoline spilled on hot parts can ignite. Read the manufacturer’s instructions before you ever need to use it, not by flashlight in a storm.

    The Food Clock: What’s Safe and What Isn’t

    When the power dies, your refrigerator and freezer start a countdown — and the most important move is the easiest: keep the doors shut. Every time you open them, you let the cold escape and shorten the clock. Sealed, your refrigerator keeps food safe for about 4 hours. A full freezer holds a safe temperature for about 48 hours, or roughly 24 hours if it’s only half full — which is why packing the freezer (even with jugs of water) helps it ride out an outage.

    Once the power has been out longer than four hours, refrigerated perishables — meat, poultry, fish, eggs, milk, leftovers, and cut produce — should be thrown out. Use your appliance thermometer or check each item with a food thermometer: anything that has sat at 40°F or above for two hours or more is no longer safe, as is anything with an off smell, color, or texture. The cardinal rule is one you must not break: never taste food to decide if it’s safe, because the bacteria that make you sick are invisible and flavorless. When in doubt, throw it out — a fridge of groceries is never worth a hospital trip. For longer outages, move food to coolers packed with ice or frozen gel packs (or dry ice), keeping everything at 40°F or below, and refreeze thawed items only if they still hold ice crystals.

    The Food-Safety Clock

    Keep doors closed. Every peek shortens the clock.

    Refrigerator: safe for about 4 hours.

    Full freezer: about 48 hours · Half-full: about 24 hours.

    Toss it if it’s been at 40°F+ for 2+ hours. Never taste to check — when in doubt, throw it out.

    Light and Warmth Without Starting a Fire

    It’s tempting to reach for candles when the lights go out, but flashlights and battery lanterns are far safer. Open flames left burning in a dim, disrupted house — knocked over by a pet, forgotten in another room, set near a curtain — cause needless fires every year. If you do use candles, never leave them unattended and keep them well away from anything flammable. Better yet, hand a flashlight to everyone and skip the flame entirely.

    Temperature is the other comfort that tempts people into danger. In cold weather, layer up, close off unused rooms to concentrate warmth, and use blankets and sleeping bags — but never a gas stove, oven, grill, or unvented fuel heater, all of which produce deadly CO indoors. In hot weather, stay hydrated, dampen your skin, and rest in the lowest, shadiest part of your home. If the heat or cold becomes extreme — especially dangerous for the very young, the elderly, and the chronically ill — don’t tough it out. Check with local officials and relocate to a community warming or cooling center with power.

    Protect Your Electronics — and Yourself

    When power is restored, it often returns with a surge or spike that can fry sensitive electronics. So during the outage, turn off and unplug computers, TVs, and major appliances, leaving just one lamp switched on so you’ll know at a glance when the power comes back. This simple step protects your devices and prevents an overloaded jolt to the grid the moment everything reconnects at once.

    Outside, the gravest risk is a downed power line. Always assume a fallen line is live and lethal, even if it looks dead and silent. Stay far away — at least the length of a bus, and farther if it’s near water or a fence it could energize — keep children and pets back, never drive over a line, and report it to your utility and 911 immediately. The same caution applies to any flooded basement or wet area where electricity might be present: don’t wade in until you’re sure the power to that area is off.

    Don’t Forget the People Who Depend on Power

    For some households, an outage is more than uncomfortable — it’s a medical emergency in slow motion. If anyone relies on an electric medical device, such as an oxygen concentrator, ventilator, or powered wheelchair, put your backup-power plan into action immediately and contact your utility and, if needed, emergency services. Keep refrigerated medications cold in a cooler; if the outage stretches beyond about a day, ask a pharmacist before using medicine that should have stayed chilled, and follow the label, which sometimes allows limited time at room temperature.

    Then look beyond your own walls. Extreme heat and cold are most dangerous to older adults, infants, and people who are ill or alone — and a neighbor riding out a blackout by themselves may be in real trouble without anyone knowing. A quick knock to check on elderly or vulnerable neighbors is one of the most valuable things you can do during an outage, and it costs nothing. Community resilience in a blackout is mostly just people looking out for each other.

    When the Power Comes Back

    The outage isn’t quite over when the lights flicker on. Turn appliances and electronics back on gradually over a few minutes rather than all at once, to avoid a damaging surge. Then work through the food clock honestly: check temperatures, discard anything that crossed the line, and resist the urge to gamble on a questionable item. Restock whatever you used from your kit — batteries, water, power-bank charge — so you’re ready for next time, and recharge those frozen water jugs. If you ran a generator or any fuel-burning device at all, stay alert for lingering carbon monoxide symptoms like headache, dizziness, or nausea, and get to fresh air and medical help if they appear. A little diligence at the end keeps the outage from leaving a hidden problem behind.

    Keep It an Inconvenience, Not a Tragedy

    A blackout is one of the few emergencies where the danger is almost entirely in your own hands. The darkness won’t hurt you. What hurts people is the generator dragged into the garage, the stove lit for warmth, the candle left burning, the leftovers eaten on a hopeful guess. Every one of those is avoidable with a rule you’ve already read here: fuel-burning engines stay outside and far from the house, gas stoves never heat a room, flashlights beat candles, and when in doubt, the food goes out.

    Build the kit before you need it, put battery CO alarms on every floor, make a plan for anyone who depends on power, and know the food clock by heart. Do that, and the next time the grid goes down, you’ll do what you’re supposed to do in an outage — light a lantern, pull out a board game, check on a neighbor, and wait it out in safety until the lights come back on.

    Generators outside, stoves off, doors closed — and CO alarms watching while you wait.

    This article is for general educational purposes. For authoritative, detailed guidance, see Ready.gov, the CDC, and the USDA’s food safety in emergencies guidance. Always follow the instructions for your specific generator and the directions of local authorities.

  • The Kitchen Habits That Quietly Prevent Food Poisoning

    The Kitchen Habits That Quietly Prevent Food Poisoning

    When people get food poisoning, they tend to blame the last restaurant they visited — but most foodborne illness actually starts at home, in ordinary kitchens, from small invisible mistakes nobody noticed making. It’s a bigger problem than most of us assume: the CDC estimates about 48 million Americans get sick from food each year — roughly one in six of us — with 128,000 hospitalized and 3,000 deaths. The unsettling part is that the bacteria responsible are completely invisible: you can’t see them, smell them, or taste them. The reassuring part is that protecting your household doesn’t take special equipment or expertise. It takes a handful of small, quiet habits, built on four simple ideas — clean, separate, cook, and chill — that the USDA has spent decades refining. Here’s how to make them second nature.

    The Enemy You Can’t See, Smell, or Taste

    The first thing to understand is why food poisoning catches careful people off guard: the danger gives no warning. Harmful bacteria like Salmonella, E. coli, and Listeria don’t change how food looks, smells, or tastes, so “it seemed fine” is no protection at all. A chicken breast can be loaded with enough bacteria to make a family sick and look, smell, and taste perfectly normal. That’s what makes the habits below matter so much — they’re defending you against a threat your senses simply can’t detect.

    It matters even more because of how fast bacteria multiply. In the temperature range between 40°F and 140°F — what food-safety experts call the “danger zone” — bacteria can double in number in as little as 20 minutes. A small, harmless amount on a warm countertop can become a dangerous dose by dinnertime. Everything that follows is really about two goals: not letting bacteria spread around your kitchen, and not giving them the warmth and time they need to multiply.

    Clean: Hands and Surfaces, Often

    The most basic habit is also the most powerful. Wash your hands with soap and warm water for at least 20 seconds — about as long as humming “Happy Birthday” twice — before you start cooking and, crucially, immediately after handling raw meat, poultry, eggs, or seafood. Plain soap is fine; you don’t need antibacterial. Then extend the same attention to your gear: wash cutting boards, knives, and countertops with hot, soapy water after they touch raw meat, and rinse fresh fruits and vegetables under running water before eating or preparing them. It’s worth rinsing produce even when you plan to peel it — a knife can drag surface bacteria from the rind into the flesh — and giving firm items like melons and cucumbers a scrub with a clean brush. For a deeper clean on cutting boards, the USDA suggests a sanitizing solution of about a tablespoon of unscented liquid bleach per gallon of water.

    Now for the habit that needs unlearning, because it’s one of the most common kitchen mistakes there is: do not wash raw chicken — or any raw meat. It feels clean and responsible, but USDA research is clear that rinsing raw poultry or meat doesn’t remove the bacteria; it splashes them. Water hitting the meat aerosolizes contaminated droplets that land on your sink, faucet, counters, and nearby food, sometimes several feet away, spreading the very germs you were trying to remove. Cooking the meat to the right temperature is what actually kills those bacteria — washing only relocates them onto surfaces you’ll touch later. Skip the rinse entirely.

    Wash This, Not That

    DO wash: your hands (20 seconds), cutting boards, knives, countertops, and fresh produce under running water.

    DON’T wash: raw chicken, turkey, beef, pork, or other raw meat — rinsing spreads bacteria around your kitchen. Cooking, not washing, is what makes it safe.

    Separate: Keep Raw Away From Ready-to-Eat

    Cross-contamination — bacteria hitching a ride from raw meat to food that won’t be cooked — is one of the leading causes of foodborne illness, and it’s entirely preventable with a few deliberate habits. The cornerstone is to keep raw meat, poultry, seafood, and eggs physically separate from everything else. Use two cutting boards: one reserved for raw meat and poultry, another for produce, bread, and anything ready to eat. Never let a salad ingredient touch the board you just cut chicken on, and never put cooked food back on the unwashed plate that held it raw — a classic barbecue mistake that re-contaminates food you just safely grilled.

    Carry the principle into the fridge and the store. At home, store raw meat on the bottom shelf in a sealed container or bag, so its juices can’t drip onto produce or leftovers below. Marinate in the refrigerator, never on the counter, and never reuse a marinade that touched raw meat unless you boil it first. At the grocery store, bag raw meat separately from other items so leaking juices stay contained. And throw away the foam trays and plastic wrap that raw meat came in — don’t reuse them. None of these takes real effort; they’re just small choices that keep one contaminated item from infecting a whole meal.

    Cook: Use a Thermometer, Not Your Eyes

    Here’s a myth that causes real illness: that you can tell food is safely cooked by looking at it. You can’t. The USDA is emphatic that color and juices are not reliable indicators of doneness. Ground beef can turn brown before it’s reached a safe temperature, and a roast can stay slightly pink well after it’s safe to eat — so judging by appearance means you’re guessing. The only way to know food has gotten hot enough to kill bacteria is to measure its internal temperature with a food thermometer, inserted into the thickest part. An inexpensive instant-read thermometer is the single best food-safety tool you can own.

    Each food has a target. Cook poultry to 165°F; ground meats and egg dishes to 160°F; and steaks, chops, and roasts of beef, pork, lamb, or veal to 145°F followed by a three-minute rest. Reheat leftovers all the way to 165°F, until steaming hot throughout. And never partially cook meat to finish later — that just gives surviving bacteria a warm head start. Keep the chart below handy until the numbers are memorized.

    Food Safe Minimum Internal Temperature
    All poultry (chicken, turkey — whole, parts, or ground) 165°F
    Ground meats (beef, pork, lamb, veal) & egg dishes 160°F
    Beef, pork, lamb, veal — steaks, chops, roasts 145°F + rest 3 minutes
    Fish & shellfish 145°F (or opaque and flaky)
    Leftovers & casseroles 165°F

    Chill: Beat the Clock and the Danger Zone

    Cooking food safely is only half the battle; how you store it matters just as much, because bacteria can recontaminate cooked food and multiply if it sits out. Keep your refrigerator at 40°F or below and your freezer at 0°F or below — and actually check with an appliance thermometer rather than trusting the dial, since many home fridges run warmer than people assume. Remember the danger zone (40°F to 140°F): hot food should be kept hot, cold food kept cold, and nothing perishable should linger in between.

    That’s where the 2-hour rule comes in, and it’s worth burning into memory: perishable food should not sit at room temperature for more than two hours — or just one hour if it’s above 90°F, like at a summer cookout. Past that, discard it, even if it looks and smells fine. When you put leftovers away, divide them into shallow containers so they cool quickly, and get them in the fridge within that two-hour window. Plan to eat or freeze refrigerated leftovers within about three to four days. And thaw frozen food safely — in the refrigerator, in cold water changed every 30 minutes, or in the microwave — but never on the counter, where the outside of the food sits in the danger zone for hours while the center is still frozen.

    Two Chilling Rules to Memorize

    The 2-hour rule: Toss perishable food left out more than 2 hours — or 1 hour if it’s hotter than 90°F. Refrigerate leftovers in shallow containers within that window.

    Thaw safely: In the fridge, in cold water (changed every 30 min), or in the microwave — never on the counter.

    Some People — and Some Foods — Need Extra Care

    Food poisoning is miserable for anyone, but for certain people it can be genuinely dangerous, so households that include them should hold to these habits especially tightly. The higher-risk groups are pregnant women, young children, adults over 65, and anyone with a weakened immune system — from illness, treatment, or chronic conditions. In these groups, an infection that would give someone else a rough couple of days can lead to hospitalization or worse, which makes the small precautions above non-negotiable rather than optional.

    A handful of foods carry more risk than others and deserve extra caution, particularly for those vulnerable groups. These include raw or undercooked eggs, meat, poultry, and seafood (including raw oysters and other shellfish); unpasteurized (raw) milk, soft cheeses, and juices; raw sprouts, which are grown in warm, bacteria-friendly conditions; and deli meats and hot dogs, which can harbor Listeria unless heated until steaming. None of these is forbidden for healthy adults who handle them properly, but if you’re cooking for someone in a high-risk group, it’s worth steering around them or taking the extra step — thoroughly cooking, choosing pasteurized products, and reheating deli meats — to be safe.

    The Small Habits That Catch the Rest

    A few more quiet habits close the remaining gaps. The most important: don’t taste food to check whether it’s still good. Since you can’t taste the bacteria that cause illness, a sample tells you nothing about safety and may expose you to a dangerous dose. When you’re unsure whether a leftover has been around too long, follow the oldest rule in the kitchen — when in doubt, throw it out. A few dollars of food is never worth a hospital visit.

    Pay attention to your sponges and dishcloths, too, since a damp sponge is one of the germiest things in the whole kitchen. Sanitize them regularly — microwaving a wet sponge or running it through the dishwasher helps — and replace them often. Wash your reusable grocery bags periodically, especially any that carry raw meat. Don’t overstuff the refrigerator, because cold air needs room to circulate to keep everything below 40°F. And build the simple reflex of cleaning as you go, wiping down surfaces between tasks so a single raw item doesn’t quietly spread itself across your whole cooking session.

    The Habit Why It Quietly Protects You
    Wash hands 20 sec before & after raw meat Stops bacteria from spreading to everything you touch
    Don’t rinse raw chicken Prevents splashing germs across the kitchen
    Separate cutting boards for raw meat Blocks cross-contamination to ready-to-eat food
    Use a food thermometer Confirms bacteria are killed — color can’t
    Follow the 2-hour rule Denies bacteria the time they need to multiply

    Small Habits, Invisible Protection

    Food safety isn’t dramatic. It’s a clean pair of hands, two cutting boards, a thermometer in the drawer, and a fridge you trust because you checked it. None of it is hard, and none of it is memorable — which is exactly the point. The whole reason food poisoning feels like bad luck is that the habits which prevent it are so quiet you forget you’re doing them. Clean, separate, cook, chill: four ideas that fit on a sticky note and protect everyone who eats at your table.

    Pick the one habit you’ve been skipping — maybe it’s washing the chicken you should stop washing, or trusting the color of a burger instead of a thermometer, or letting leftovers cool on the stove all evening — and fix that one this week. Then the next. Bit by bit, your kitchen becomes a place where the invisible threat simply never gets a foothold, and a good meal stays nothing but a good meal.

    You can’t see the bacteria — so let the habits do the seeing for you.

    This article is for general educational purposes. For authoritative, detailed guidance, see FoodSafety.gov and the USDA Food Safety and Inspection Service, including its safe minimum internal temperature chart. If you suspect serious food poisoning — especially with high fever, persistent vomiting, signs of dehydration, bloody stools, or symptoms lasting more than a few days — contact a healthcare provider promptly.

  • Five First-Aid Skills Every Household Should Actually Know

    Medical emergencies don’t happen in hospitals. They happen in kitchens and on living-room floors, to the people you love most, and in those first few minutes — before the ambulance arrives — the most important person in the room is whoever is standing closest. That person doesn’t need a medical degree. They need a small handful of skills they can actually remember under pressure. This is a plain-language overview of the five that save the most lives at home, drawn from the American Heart Association and the American Red Cross. Learn them, and you become the person an emergency needs you to be.

    One thing before we start: reading an article is not the same as training. This is an overview to make you aware and prepared — not a substitute for a hands-on certified course, where you practice these skills on a manikin until your hands remember them. Please take a CPR and first-aid class through the Red Cross or AHA. And in any real emergency, the first step is always the same: call 911 (or your local emergency number) right away.

    1. Hands-Only CPR

    When someone’s heart suddenly stops — cardiac arrest — they collapse, become unresponsive, and aren’t breathing normally (or are only gasping). Their survival now depends on getting blood moving until help arrives, and that is exactly what CPR does. For a teen or adult who collapses this way, the AHA promotes Hands-Only CPR, which is simple enough to remember in a crisis: call 911 (put it on speaker, and send someone for an AED if one’s nearby), then push hard and fast in the center of the chest — about two inches deep, at a rate of 100 to 120 compressions a minute. That pace is famously the beat of “Stayin’ Alive,” and humming it genuinely helps. Let the chest rise fully between pushes, and don’t stop until help takes over or the person revives.

    If an AED (automated external defibrillator) is available — increasingly common in offices, gyms, and public buildings — use it. Turn it on and follow the spoken instructions exactly; it analyzes the heart and will only deliver a shock if one is needed, so you can’t get it wrong by trying. Two notes worth remembering: Hands-Only CPR is for adults and teens, while infants, children, and people who collapsed from drowning or a drug overdose need traditional CPR that includes rescue breaths — another reason to take a full class. Doing something almost always beats doing nothing; the only truly wrong move in cardiac arrest is hesitation.

    2. Helping Someone Who’s Choking

    Choking is terrifyingly fast and silent. The universal sign is hands clutched at the throat, and the key question is whether the person can move air. If they can cough forcefully, speak, or breathe, the blockage is partial — encourage them to keep coughing, which is the most effective thing, and don’t interfere. But if they can’t breathe, speak, or cough, it’s a severe obstruction and you must act immediately.

    For a choking adult or child, current AHA guidance is to alternate five back blows with five abdominal thrusts, repeating the cycle until the object comes out or the person becomes unresponsive. (This is an update worth knowing — older training taught abdominal thrusts alone for adults; the back blows are now included.) Deliver the back blows firmly between the shoulder blades with the heel of your hand, and the abdominal thrusts inward and upward just above the navel. For an infant under one year, the technique is different and gentler: alternate five back blows with five chest thrusts — never abdominal thrusts, which can injure a baby’s organs. If anyone choking becomes unresponsive, call 911 if it hasn’t been done and begin CPR. One firm rule throughout: never do a blind finger sweep into the mouth, as it usually pushes the object deeper.

    Choking: Quick Reference

    Can cough/speak/breathe? Encourage hard coughing. Don’t intervene yet — watch closely.

    Adult or child (can’t breathe): 5 back blows ↔ 5 abdominal thrusts, repeat until clear or unresponsive.

    Infant under 1: 5 back blows ↔ 5 chest thrusts (no abdominal thrusts).

    Becomes unresponsive: Call 911 and start CPR.

    3. Stopping Severe Bleeding

    A person can bleed to death in minutes, faster than an ambulance can arrive — which is why the national Stop the Bleed campaign exists to teach this skill to ordinary people. The single most effective action is the simplest: firm, direct pressure. Call 911 (or direct someone to), then press down hard on the wound with your hands, using any cloth you have — a shirt, a towel, gauze — which does not need to be sterile. Press with your full weight, keep the person lying down, and hold continuous pressure for at least several minutes without lifting to peek, because every time you check, you let the clot break and the bleeding restart. Maintain pressure until help arrives.

    For a deep wound on an arm or leg where pressure alone won’t stop the flow, pack the wound — firmly stuff clean cloth or gauze directly into it — and keep pressing hard on top. And for life-threatening bleeding from a limb that direct pressure can’t control, a tourniquet can save a life: place it two to three inches above the wound (never on a joint), tighten it until the bleeding stops, note the time, and — this part matters — do not loosen or remove it. Leave it for the medical professionals. A tourniquet is painful and that’s expected; keeping someone alive comes first. One more rule: if an object is impaled in a wound, don’t pull it out — press around it instead, since it may be plugging the very vessel that would otherwise bleed.

    4. Spotting a Stroke or Heart Attack

    This skill isn’t about treatment — it’s about recognition and speed, because for both a stroke and a heart attack, tissue is dying every minute and the treatments that save people only work within a narrow window. For a stroke, the AHA’s memory aid is FAST: Face drooping (ask them to smile — is it uneven?), Arm weakness (ask them to raise both arms — does one drift down?), Speech difficulty (ask them to repeat a simple sentence — is it slurred?), and Time to call 911. Some versions add Balance loss and Eye/vision changes. Call 911 the moment you see any of these — even if the symptoms go away — and note the time they started, because that single fact shapes the treatment doctors can give. Don’t give a suspected stroke patient aspirin; if it’s a bleed in the brain, aspirin makes it worse.

    A heart attack can look less dramatic than the movies suggest. Watch for chest pressure, squeezing, or pain that may radiate to the arm, jaw, neck, back, or stomach, along with shortness of breath, a cold sweat, nausea, or lightheadedness — and know that symptoms can be subtler in women. The response is the same: call 911, and don’t drive to the hospital. Emergency responders begin life-saving treatment the moment they arrive and en route, and people have died in the passenger seat on the way to the ER. If the person becomes unresponsive and stops breathing normally, that’s cardiac arrest — start CPR.

    Know the Signs — Then Call 911

    Stroke (FAST): Face drooping · Arm weakness · Speech difficulty · Time to call 911. (Also: sudden balance or vision changes.)

    Heart attack: Chest pressure/squeezing · pain spreading to arm, jaw, neck, back · shortness of breath · cold sweat, nausea. Call 911 — don’t drive.

    5. Treating a Burn the Right Way

    Burns are among the most common household injuries, and they’re also the ones people most reliably treat wrong, thanks to stubborn old myths. Here’s what actually works. First, remove jewelry and clothing near the burn — but not anything stuck to the skin — before the area swells. Then cool the burn under clean, cool (not icy) running water for about 10 to 20 minutes, or until the pain eases. This is the single most important step: it carries heat out of the skin and limits the damage, and it’s worth doing as soon as possible after the burn. If there’s no running water, use a cool, wet compress.

    Now the myths to abandon. Don’t put ice on a burn — it’s so cold it causes further tissue damage. And don’t apply butter, oil, toothpaste, or any greasy home remedy; far from helping, they seal heat into the skin and raise the risk of infection. Once cooled, cover the burn loosely with a clean, non-stick dressing or even plastic wrap, and leave blisters intact — they protect the healing skin underneath. Over-the-counter pain relief is fine. Seek medical care for any burn that is large (bigger than the person’s palm), deep, or located on the face, hands, feet, genitals, or a major joint — and call 911 for chemical and electrical burns, since even a small-looking electrical burn can mask serious internal injury.

    The Myth What to Actually Do
    Put butter or ice on a burn Cool running water, 10–20 min; no ice, no grease
    Slap a phone-finder sweep into a choking mouth Back blows + thrusts; no blind finger sweeps
    Peek at a wound to “check” the bleeding Hold firm pressure without lifting; pack if deep
    Drive a heart-attack patient to the ER yourself Call 911; treatment starts before the hospital
    “Wait and see” if stroke signs fade Call 911 anyway; note the time symptoms began

    The Three Rules That Tie It All Together

    Behind all five skills sit three habits that make them work. First, call 911 early — getting professional help on the way is itself a life-saving act, and a dispatcher can coach you through what to do while you wait, so put the phone on speaker and keep your hands free. Second, get real training. Knowing these steps on paper is a fine start, but in a true emergency, adrenaline erases anything you haven’t practiced with your hands; a few hours in a certified Red Cross or AHA course turns vague knowledge into reflexes you can trust, and refreshing it every couple of years keeps it sharp.

    Third, keep a stocked first-aid kit and make sure everyone in the household knows where it is. A good kit holds gloves, gauze and dressings, adhesive bandages, tape, antiseptic, scissors, and a few specific items like a tourniquet if you’ve been trained to use one — and it’s worthless if it’s buried in a closet no one can find at 2 a.m. Check it once a year, replace what’s expired, and post your local emergency numbers somewhere visible. Preparation is quiet and boring right up until the moment it’s the most important thing in the world.

    One honorable mention belongs in every household where someone has a serious allergy: know the signs of anaphylaxis — sudden trouble breathing, swelling of the face, lips, or throat, hives, or faintness after a food, sting, or medication — and know how to use an epinephrine auto-injector. If a person at risk has one prescribed, learn the steps before an emergency, use it at the first sign of a severe reaction (it works fast and is far safer than waiting), and always call 911 afterward, since symptoms can return. Like the five core skills, it’s a few minutes of learning that can buy someone the time they need.

    Be the Person the Emergency Needs

    You will probably never have to use most of these skills. But the one time you do, there will be no time to look anything up — there will only be you, the person you love, and the minutes before help arrives. Hands-only CPR, clearing a choking airway, stopping a bleed, spotting a stroke or heart attack, and cooling a burn the right way: five skills, each learnable in an afternoon, each capable of saving a life in your own home.

    So treat this article as the nudge, not the training. Sign up for a hands-on CPR and first-aid class, build your kit, and talk through these steps with your family. The goal isn’t to make you anxious about everything that could go wrong — it’s to make sure that if something ever does, you’ll know exactly what to do while you wait for the ambulance you’ve already called.

    Call 911 first — then take a class, before you ever need it.

    This article is for general education only and is not medical advice or a substitute for professional, hands-on first-aid and CPR training or for emergency medical care. In any emergency, call 911 or your local emergency number immediately. For authoritative guidance and to find a class, see the American Heart Association and the American Red Cross, and learn bleeding control through Stop the Bleed.

  • Staying Safe Abroad: A Pre-Trip Safety Checklist

    Staying Safe Abroad: A Pre-Trip Safety Checklist

    Traveling to another country is one of the great pleasures in life — and a completely different risk environment than the one you know. Abroad, the laws are different, the emergency number isn’t 911, your health insurance may not work, the local scams are unfamiliar, and the safety net you take for granted at home simply isn’t there. The reassuring part is that the overwhelming majority of travel trouble is preventable, and almost all of that prevention happens before you leave. Two free U.S. government resources — the State Department and the CDC — do most of the heavy lifting, and a handful of small tasks in the weeks before departure handle the rest. This is the pre-trip checklist that keeps a dream trip from becoming a cautionary tale. (Travelers from other countries should swap in their own foreign ministry and health authority, but the steps are the same everywhere.)

    Start With the Two Official Sources

    Before anything else, read what your government already knows about your destination. The State Department’s Travel Advisories rate every country on a four-level scale: Level 1 (exercise normal precautions), Level 2 (exercise increased caution), Level 3 (reconsider travel), and Level 4 (do not travel). Crucially, don’t stop at the headline number — open the full country information page, which breaks down the specific risks behind the rating using indicators like crime, terrorism, civil unrest, health, natural disasters, and kidnapping. A country can be Level 2 overall while one region is far more dangerous than the rest, and that detail only appears in the full page. These advisories are reviewed regularly and updated whenever conditions shift.

    The second source covers your health. The CDC’s Travelers’ Health site has a destination-specific page for nearly every country, listing the vaccines you need, the diseases present, and the food, water, and insect precautions that matter there. The two agencies are complementary, not redundant: the State Department assesses safety and security, while the CDC focuses specifically on health. A place can be perfectly calm yet have a serious disease outbreak, or vice versa, so check both. Reading these two pages takes fifteen minutes and is the single most valuable thing you can do before booking.

    Enroll in STEP — the Five-Minute Step Most People Skip

    This one is free, fast, and genuinely important, yet most travelers have never heard of it. The State Department’s Smart Traveler Enrollment Program (STEP) lets you register your trip with the nearest U.S. embassy or consulate. Once enrolled, you receive their safety alerts and updates for your destination — and, far more importantly, the embassy knows you’re there. If a natural disaster, political crisis, or security incident hits while you’re in the country, you’re on the list of citizens they’re trying to reach and help. STEP also works in the other direction: if there’s an emergency back home, it gives the State Department a way to help your family reach you. Enrolling takes about five minutes at step.state.gov, and it costs nothing.

    Keep These Handy While Abroad

    Enroll in STEP at step.state.gov before you go.

    Nearest U.S. embassy/consulate — look up its address and phone before arrival.

    Local emergency number — it is usually not 911; look up police/ambulance/fire for your destination.

    State Dept 24/7 Consular line: 1-888-407-4747 (from U.S./Canada) or 1-202-501-4444 (from overseas).

    Documents: Passports, Visas, and Copies

    Check your passport’s expiration date the moment you start planning, because of a rule that strands travelers constantly: the six-month validity rule. Many countries won’t let you enter unless your passport is valid for at least six months beyond your travel dates — meaning a passport that hasn’t technically expired can still get you denied at the gate. (Some destinations require only three months, and a few only validity at entry, so confirm the exact rule for your country.) If you’re cutting it close, renew early; routine renewals take several weeks. And note one scam-prevention point: the only official passport renewal site is travel.state.gov — the web is full of fraudulent third-party “renewal” services.

    Next, sort out entry requirements: many destinations need a visa, an electronic travel authorization, or an arrival form arranged in advance, and these vary enormously by country and nationality. Finally, make copies of your key documents — passport, travel insurance, itinerary, and the cards in your wallet. Keep a digital set (in secure cloud storage or your email) and a paper set, store them separately from the originals, and leave a copy with someone at home. If your passport is lost or stolen abroad, a copy dramatically speeds up getting a replacement at the embassy.

    Health: See Someone Before You Go

    Ideally about four to six weeks before departure, see your doctor or a travel-medicine clinic — that lead time matters because some vaccines need multiple doses or time to take effect. Make sure your routine vaccinations are up to date (the CDC specifically flags being current on polio and measles before international travel), and get any destination-specific shots your CDC page recommends or requires, such as typhoid, hepatitis A, or yellow fever. If your destination has malaria, ask about preventive medication.

    For prescription medications, pack enough for the whole trip plus a buffer, keep them in their original labeled containers, and carry a copy of the prescription or a doctor’s note — some medicines that are routine at home are restricted or illegal in other countries, so check before you fly. Throw together a small health kit too: any personal medications, pain relievers, anti-diarrheal and rehydration supplies, bandages, and hand sanitizer. And read the CDC’s food and water guidance for your destination, since traveler’s diarrhea is the most common travel illness and is largely avoidable with a few simple habits. In many places the rule of thumb is to drink only sealed or treated water, skip ice of unknown origin, and favor food that’s been thoroughly cooked and served hot — “boil it, cook it, peel it, or forget it” is a crude but useful guide. If you take regular medications or have a chronic condition, it’s also wise to carry a brief note from your doctor summarizing your history and medication list, which can be invaluable if you need care from a clinician who doesn’t have your records.

    Insurance: The Gap That Surprises People

    Here’s the assumption that costs travelers the most: that your regular health insurance covers you abroad. Very often it doesn’t, and Medicare generally provides no coverage outside the United States at all. That leaves a dangerous gap, because a medical emergency in another country can run into serious money — and a medical evacuation, flying you to adequate care or home, can cost tens of thousands of dollars out of pocket.

    The fix is travel insurance, but know that it comes in distinct types. Travel health insurance covers medical care while you’re abroad; medical evacuation insurance covers that very expensive transport; and trip-cancellation insurance covers your prepaid costs if you have to cancel — a different product entirely. For international trips, the first two are the ones that protect you from catastrophe. Before buying, check what you may already have: some credit cards and existing policies include limited travel medical or evacuation benefits, and it’s worth knowing the gaps before you fill them.

    Money and Staying Connected

    Tell your bank and card issuers your travel dates and destinations so they don’t freeze your cards for “suspicious” foreign activity at the worst possible moment. Then build in redundancy: carry more than one way to pay — at least two cards from different networks plus some local cash — and never keep it all in one place. Stash a backup card and some emergency cash separately from your wallet, so a single theft can’t leave you stranded with nothing. As at home, a credit card is your safest day-to-day payment abroad because of its fraud protections, while a money belt or a hidden pouch keeps your cash and passport off the surface for pickpockets.

    Sort out connectivity before you land: an international plan, a local SIM, or an eSIM, so you can reach maps, translation, your bank, and emergency services. Download offline maps of where you’re going, and save key addresses and numbers somewhere they’ll work without signal. Being reachable and able to navigate is itself a safety feature.

    Plan for Staying Safe on the Ground

    A few decisions made before you leave shape how safe you’ll be once you arrive. Learn the local laws and customs, and take them seriously — abroad you’re subject to their laws, not your country’s, and things that are legal or trivial at home (certain medications, photographing government or military sites, drug possession, dress in religious places, alcohol in some countries) can carry severe penalties elsewhere. Read up on the common scams at your destination — every tourist hotspot has its signature tricks, from rigged taxi meters to distraction-pickpocket teams — so they don’t catch you off guard.

    Give real thought to transportation, because traffic crashes are one of the leading causes of injury and death for travelers abroad. Use licensed taxis or established rideshare apps rather than unmarked cars, wear a seatbelt even where locals don’t, be cautious about driving in unfamiliar and chaotic conditions, and think hard before renting a motorbike — a helmet and your travel insurance terms both matter. Practice ordinary situational awareness: keep valuables out of sight, stay alert in crowds and at ATMs, and trust your instincts about places and situations that feel wrong.

    Protect your digital self too. On hotel and cafe Wi-Fi, avoid logging into banking or sensitive accounts unless you’re using a VPN, since public networks abroad are easy to snoop on. Be cautious about posting your real-time location and travel plans on social media, which can advertise to the wrong people that you’re away or alone. And before you go, share your itinerary with someone you trust at home and set a simple check-in plan — a quick message on arrival and at key points — so someone always has a rough idea of where you are.

    If Something Goes Wrong Abroad

    Even with perfect preparation, things occasionally go sideways — so it helps to know the plan before you need it. If your passport is lost or stolen, contact the nearest U.S. embassy or consulate; with your copies in hand, they can issue a replacement, often quickly in an emergency. For a medical emergency, call your travel insurer’s 24/7 assistance line (save it in your phone) — they help locate appropriate care and coordinate payment or evacuation — and the embassy can also help you find local medical services and contact family.

    If you’re robbed or run out of money, the embassy can help you reach family or your bank to arrange an emergency transfer. And if you’re ever detained or arrested, understand the limits clearly: the embassy cannot get you out of jail or override local law, but it can provide a list of local attorneys, notify your family, and monitor your treatment. In any serious crisis, the State Department’s Consular Affairs line — 1-888-407-4747 from the U.S. and Canada, or 1-202-501-4444 from overseas — is staffed around the clock. Knowing these channels exist turns a panic into a procedure.

    When Do This
    Before booking Read the State Dept advisory + full country page and the CDC destination page
    As soon as you book Check passport 6-month validity; arrange visa/entry forms; buy travel + evacuation insurance
    4–6 weeks out See a doctor for vaccines and prescriptions; refill enough medication
    Week before Enroll in STEP; copy documents; notify your bank; set up phone/eSIM and offline maps
    Before you fly Share itinerary with someone home; save embassy + local emergency numbers

    Prepare Once, Relax the Whole Trip

    None of this is meant to make travel sound frightening — it’s meant to make it carefree. The traveler who has read the advisories, enrolled in STEP, checked their passport, seen the doctor, bought real insurance, and copied their documents isn’t anxious abroad; they’re free to enjoy themselves, because the things that derail trips have already been handled. An afternoon of preparation buys you weeks of peace of mind.

    Work the checklist in order, lean on the two free government resources that exist precisely for this, and carry your embassy and emergency numbers where you can find them. Then go — see the world, eat the food, get a little lost in the good way. The whole point of preparing for the worst is that you almost never have to think about it again.

    Check the advisory, enroll in STEP, copy your documents — then enjoy the trip.

    This article is for general guidance and isn’t legal, medical, or insurance advice; entry rules and conditions change, so confirm specifics for your destination and nationality before traveling. For authoritative, up-to-date information, see the U.S. State Department’s travel advisories and the CDC’s Travelers’ Health. Enroll in STEP at step.state.gov.

  • Winter Driving and the Emergency Kit for Your Trunk

    Winter Driving and the Emergency Kit for Your Trunk

    Winter Driving and the Emergency Kit for Your Trunk

    Winter has a way of turning an ordinary drive into something genuinely dangerous. Snow, ice, and a few seconds of lost traction are all it takes — and the numbers bear it out: in a recent year, the National Highway Traffic Safety Administration counted more than 100,000 police-reported crashes, over 20,000 injuries, and hundreds of deaths in snowy or sleety conditions in a single season. Staying safe through winter comes down to two things working together: how you drive when the roads turn treacherous, and what’s waiting in your trunk for the moment driving carefully isn’t enough — when you slide into a ditch, lose power, or get stranded as a storm closes in. This guide covers both halves: the skills that keep you out of trouble, and the kit that keeps you alive if trouble finds you anyway.

    Part 1: Get the Car Ready Before the First Storm

    Winter safety starts in the driveway, not on the highway. Before the cold settles in, give your vehicle a once-over. Your tires matter most — check that the tread is deep enough to grip and that they’re inflated to the right pressure, since cold air lowers it and bald tires are nearly useless on snow. Have your battery tested, because cold dramatically cuts its power and a marginal battery dies on the first frigid morning. Top off the coolant to the manufacturer’s spec, make sure the defrosters and heater work, and replace worn wiper blades — ideally with winter blades — while filling the reservoir with cold-weather washer fluid that won’t freeze, because a single snowstorm can drain it fast. Check that every light works, and keep your gas tank at least half full all winter to reduce the risk of a frozen fuel line and to give you a reserve if you’re ever stuck.

    If you live somewhere with real winters, consider dedicated winter (snow) tires rather than all-season tires. All-season tires harden and lose grip as temperatures drop, while winter tires use softer rubber and an aggressive tread designed to bite into snow and ice — the difference in stopping distance and cornering grip is substantial, and it applies to every kind of vehicle, AWD included. Mount them in sets of four, not just on the drive wheels, and swap them off once the cold breaks so they don’t wear prematurely. It’s an investment, but on regularly snowy roads it’s one of the most effective safety upgrades you can make.

    Then there’s the habit too many drivers skip: clear the snow and ice off the entire car before you move, not just a peephole on the windshield. That means all the windows, the mirrors, the headlights and taillights, any cameras or sensors — and the roof, because a slab of snow sliding off your roof at speed blinds you or the driver behind you. Two minutes with a brush is the price of actually being able to see and be seen.

    The Golden Rule: Slow Down and Leave Room

    Almost everything about safe winter driving flows from one principle: give yourself more time and space than you think you need. Slow down — it takes far longer to stop or steer on a slick surface, and the posted limit assumes dry pavement. Increase your following distance dramatically; where three seconds is the dry-road minimum, winter calls for five or six seconds at least, and AAA recommends stretching it to eight to ten seconds on snow and ice. That cushion is what gives you room to brake gently instead of slamming the pedal and losing control.

    Make every input smooth and gradual — accelerate slowly, brake early and softly, and steer gently. Sudden moves are what break traction, so the goal is to do everything in slow motion. Don’t use cruise control on snow or ice; it can keep applying power when you’ve lost grip, and you want full manual control to react. And let go of one dangerous myth: all-wheel drive and four-wheel drive help you accelerate, but they do nothing to help you stop or turn. On ice, an AWD vehicle stops no faster than any other — the confidence it gives going forward is exactly what puts overconfident drivers in the ditch. Traction to go is not traction to stop.

    Braking, Skids, and the Ice You Can’t See

    Knowing how to brake on a slick road is its own skill. If your car has antilock brakes (ABS) — nearly all modern cars do — apply firm, continuous pressure and hold it; you’ll feel the pedal pulse and may hear grinding, which is normal, and you should keep steering. Don’t pump ABS brakes. If you drive an older vehicle without ABS, pump the pedal gently instead. Either way, braking earlier and softer beats braking hard and late every time.

    Watch especially for black ice — the thin, transparent glaze that looks like wet pavement and is nearly invisible. It forms first on bridges, overpasses, and shaded patches, which freeze before the rest of the road because cold air circulates above and below them. Ease off the gas as you approach these spots and avoid braking or steering on them. A couple more rules round it out: try not to stop while going uphill, since you may not get moving again — build a little momentum before the climb and let it carry you. And don’t crowd snow plows; they move slowly, make wide turns, and throw snow, so stay well back and pass only with great care.

    If You Start to Skid

    1. Stay calm and ease off the gas. Don’t slam the brakes — that usually makes a skid worse.

    2. Look and steer where you want to go. Keep your eyes on your intended path, not on what you’re sliding toward; your hands follow your eyes.

    3. Make gentle corrections. Steer smoothly into the direction the rear is sliding, then straighten out. Avoid sudden, large movements.

    Plan Before You Pull Out

    The safest winter drive is sometimes the one you postpone. Before heading out in bad weather, check the forecast and road conditions, and if a serious storm is coming, ask honestly whether the trip can wait — staying home keeps the roads clearer for plows and first responders, too. If you do go, allow extra time so you’re never rushing on ice, and tell someone your route and expected arrival so that if you don’t show up, people know where to look. It’s also worth practicing: take your car to an empty, snowy parking lot in daylight and feel how it brakes and slides, so the sensations aren’t a surprise at 45 mph on the highway. Confident winter driving comes from preparation, not bravado.

    Part 2: The Emergency Kit for Your Trunk

    Even careful drivers get caught out — a spinout on black ice, a dead battery in a parking lot, a road closed by a whiteout with you stuck behind it. In summer that’s an inconvenience; in winter it can become life-threatening within hours, and in a major storm, help may take a long time to reach you. A well-stocked trunk is what bridges that gap. One important tip before the list: when severe weather threatens, keep the most critical items — warmth, water, light, phone power — in the passenger compartment, not the trunk, because a frozen or jammed trunk can lock your supplies away exactly when you need them.

    Think of the kit in four jobs: getting unstuck, staying warm, staying fed and powered, and being seen.

    The Job What to Pack
    Get unstuck Snow shovel, ice scraper & brush, sand or cat litter for traction, jumper cables, tow strap/rope, tire chains where required
    Stay warm Blankets or a sleeping bag, extra hats, gloves, socks, hand and foot warmers, a spare warm layer
    Stay fed & powered Water, high-energy non-perishable snacks, phone charger and power bank, flashlight with spare batteries, any needed medications
    Be seen & get help Flares or reflective triangles, a brightly colored cloth/distress flag, a whistle, a first aid kit, a multi-tool

    A few notes that make the kit actually work when you need it. Store flashlight batteries reversed so the light can’t switch on accidentally and drain in the trunk. Keep water from bursting its bottle by leaving room for it to expand if it freezes. Check the whole kit once a year — food expires, batteries lose charge, and a power bank left for a season may be flat. And if you have children or pets who ride with you, pack for them too: extra warmth, water, and a snack sized for them.

    Knowing how to use the get-unstuck gear matters as much as having it. If a wheel is spinning, don’t just floor it — that polishes the snow into ice and digs you deeper. Instead, clear snow from around the tires with your shovel, sprinkle sand or cat litter directly in front of and behind the drive wheels for grip, and ease onto the gas gently. The classic technique is to rock the car: shift slowly between drive and reverse, building a little momentum each way until the car works free. Straightening your front wheels and easing off the gas pedal pressure also helps the tires find traction. If a few calm attempts don’t work, stop before you overheat the transmission or exhaust yourself, and call for help instead.

    If You Get Stranded: The Rules That Save Lives

    If you slide off the road or get stuck in a storm, what you do next matters enormously. The first and most important rule, echoed by the National Weather Service and AAA alike: stay with your vehicle. Your car is shelter, it’s far easier for rescuers to spot than a person on foot, and walking off into a storm is how people get lost, exhausted, and killed by the cold. Call for help if you can, give your location, and wait.

    To stay warm, run the engine and heater only intermittently — about ten minutes per hour is the common guidance — which conserves fuel and limits a hidden danger covered below. Bundle up in your blankets and layers between runs, and use floor mats, maps, or anything else to insulate yourself. Don’t overexert yourself trying to dig out or push the car; heavy effort in the cold can trigger a heart attack or leave you sweaty, and wet clothing robs your body of heat and invites hypothermia. Make yourself visible — tie a bright cloth to your antenna or window, and run the interior dome light when you hear traffic. Don’t let everyone sleep at once; keep one person watching.

    ⚠ The Carbon Monoxide Warning You Must Not Forget

    This is the one that quietly kills people every winter. When you run the engine for heat, snow and ice can pack around your exhaust pipe and force deadly carbon monoxide back into the cabin instead of out the back. Carbon monoxide is colorless and odorless — you won’t smell it, see it, or feel it coming, and it can render you unconscious before you realize anything is wrong. The CDC has documented exactly these deaths in snowstorms, often striking children and older adults in idling, snow-buried cars.

    Before running the engine, get out and clear snow from the tailpipe and the area a few feet behind the car — and always crack a downwind window an inch for fresh air while the engine runs. Recheck the exhaust as snow keeps falling. These two habits — clear pipe, cracked window — are the difference between staying warm and not waking up.

    That carbon monoxide risk is the thread connecting your trunk kit to everything else: the gear keeps you warm, but only safe technique keeps the warmth from becoming a hazard. Respect the exhaust pipe, ration the engine, keep a window cracked, and your car becomes the safe shelter it’s meant to be while you wait for help.

    Drive for the Conditions, Pack for the Worst

    Winter doesn’t reward confidence; it rewards preparation. Ready the car before the first storm, then drive like the road is trying to surprise you — slow, smooth, with a big cushion of space, no cruise control, and full respect for ice you can’t see. Remember that all-wheel drive helps you go but never helps you stop. Most winters, that caution is all you’ll ever need.

    But build the trunk kit anyway, for the day caution isn’t enough. A shovel, traction, warmth, water, light, and a way to signal can turn a terrifying night into a survivable inconvenience. And if you’re ever stranded, hold onto the three rules that matter most: stay with the car, don’t overexert yourself, and never run the engine without a clear exhaust pipe and a cracked window. Do that, and winter stays what it should be — beautiful, and survivable.

    Slow down, pack smart, and respect the exhaust pipe.

    This article is for general educational purposes. For authoritative guidance, see NHTSA’s winter driving tips, the National Weather Service, and AAA. Always follow current local conditions and official advisories where you drive.

  • Car Seats: The Mistakes Most Parents Don’t Know They’re Making

    Car Seats: The Mistakes Most Parents Don’t Know They’re Making

    You buckled your child in. The seat feels solid, the straps are clipped, everything looks right. And that’s exactly the problem — because for a huge share of families, “looks right” and “is right” are two very different things. Car crashes are a leading cause of death for children, and a correctly used car seat is one of the most protective devices ever invented for them. Yet study after study from the National Highway Traffic Safety Administration finds that roughly half of car seats — by some inspection databases, closer to two-thirds — are installed or used incorrectly. The defining feature of these mistakes is that the parents making them have no idea. The seat passed every casual glance. This article walks through the errors hiding in plain sight, so you can find the one or two that might be in your own back seat right now.

    None of this is about being a careless parent. Car seats are genuinely hard to install correctly, the manuals are dense, and almost nobody is taught how to do it properly — you just figure it out in a parking lot with a crying newborn. The mistakes below are common precisely because they’re invisible: each one leaves a seat that looks and feels fine while quietly erasing much of the protection it’s supposed to provide. Let’s make the invisible visible.

    Why “It Looks Fine” Isn’t Enough

    A car seat doesn’t have to look broken to fail. In a crash, forces multiply in fractions of a second, and the difference between a seat that protects and one that doesn’t often comes down to an inch of movement, a strap routed through the wrong slot, or a clip sitting two inches too low. These aren’t dramatic, obvious errors. They’re small, reasonable-looking things that a confident parent glances at and approves — which is why the people most certain they’ve done it right are so often the ones with something to fix. The honest starting point is humility: assume you might have a mistake in here somewhere, because the odds say you probably do.

    Mistake #1: The Seat Moves Too Much

    Loose installation is the single most common error, and it’s the one parents are most likely to get wrong while feeling sure they got it right. The standard is strict: once installed, the car seat should move less than one inch side-to-side and front-to-back when you grab it at the belt path — the spot where the seat belt or lower-anchor strap passes through — and pull firmly. Most seats that “feel tight” actually fail this test, because vehicle seat cushions are soft and compress under load.

    The fix is technique. Press down into the seat with your knee or hand to compress the cushion while you pull the strap or belt tight, then lock it off. A few related traps live here too. Don’t use the lower anchors (LATCH) and the seat belt at the same time — pick one method unless your seat’s manual specifically permits both. Remember that the lower anchors have a weight limit (based on your child’s weight plus the seat); once your child exceeds it, you must switch to a seat-belt installation. And because normal driving can gradually loosen even a good install, re-check the tightness about once a month, and whenever you move the seat between cars.

    Mistake #2: Turning Forward-Facing Too Soon

    For years, parents treated the second birthday as the green light to spin the seat around. The current guidance from both NHTSA and the American Academy of Pediatrics is different and clearer: keep your child rear-facing until they reach the top height or weight limit of their convertible seat — not merely until they turn two. For most modern seats, that limit isn’t reached until age three, four, or even later. Age two is a floor, not a goal.

    The reason is physics, and it’s compelling. A rear-facing seat cradles a child in a crash, spreading the enormous forces across the entire back, neck, and head while supporting the skull. A forward-facing child, by contrast, is thrown against the harness, concentrating that force on a still-developing neck and spine. A young child’s head is proportionally huge and their neck ligaments are immature, so the protection gap is largest exactly when they’re smallest. The most common worry — that rear-facing kids look cramped with their legs folded up — isn’t a safety concern; children are comfortable and flexible in that position, and leg injuries in rear-facing seats are very rare. Roughly a quarter of children are turned forward too early. Don’t be in a hurry to give up the safest configuration your child will ever ride in.

    Mistake #3: The Harness Is Too Loose — and the Winter Coat Trap

    A harness that’s even slightly loose lets a child move dangerously in a crash, yet many parents under-tighten it out of a worry that snug means uncomfortable. The test is simple and decisive: the pinch test. After tightening, try to pinch the harness webbing horizontally at your child’s shoulder. If you can gather a fold of slack between your fingers, it’s too loose — tighten until there’s nothing left to pinch. A properly snug harness lies flat against the body with no give, and the great majority of children are perfectly content in it; the discomfort parents fear usually comes from twisted straps or a misplaced clip, not from correct tightness.

    This connects to one of the most dangerous and least-known mistakes of all: bulky winter coats under the harness. A puffy coat looks secure when you buckle it, but in a crash the padding instantly compresses flat, leaving inches of slack in a harness that passed the pinch test over the jacket. NHTSA’s guidance is explicit — buckle your child into the seat first in their regular clothes, tighten properly, and then lay the coat or a blanket over the harness for warmth. The same caution applies to thick padding or inserts behind or under a baby: never add anything that didn’t come with the seat or isn’t approved by its manufacturer.

    Mistake #4: The Chest Clip and Straps Are in the Wrong Spot

    The chest clip is small, slides easily, and is constantly in the wrong place. It belongs at armpit level — centered on the chest, even with the armpits. Riding too low, down on the belly, it can let a child be ejected from the harness in a crash; riding too high, against the throat, it risks neck injury. It’s a two-second thing to check before every drive, and it’s wrong astonishingly often.

    The harness slot height matters just as much and changes as your child grows. For a rear-facing seat, the straps should come from the slots at or just below your child’s shoulders. For a forward-facing seat, they should come from slots at or just above the shoulders. Straps should always lie flat and untwisted. Because kids grow continuously, check the slot height every few months and rethread the harness as needed — it’s easy to set it once and forget that your child has climbed past it.

    Mistake #5: Skipping the Top Tether

    When you install a forward-facing seat with a harness, there’s one more strap that a large number of parents never connect: the top tether. It runs from the top of the car seat to a dedicated anchor point in your vehicle (check your owner’s manual for its location — often on the rear shelf, seatback, or cargo area). Its job is critical: in a frontal crash, the tether dramatically limits how far your child’s head pitches forward, by several crucial inches. Forgetting it is one of the most common forward-facing errors. One caveat: the top tether is generally for forward-facing installation; most rear-facing setups don’t use it unless your seat’s manual specifically calls for it.

    Mistake #6: Graduating to a Booster — or a Seat Belt — Too Early

    Every transition to the “next stage” feels like progress, but each one actually steps a child down a level of protection — so each should happen as late as the child’s size allows, not as early as their age or impatience suggests. Keep a child in a forward-facing harnessed seat until they hit its height or weight limit. Then move to a booster, which exists for one purpose: to raise the child so the adult seat belt crosses their body in the right places. And keep them in that booster until the seat belt genuinely fits without it — which, for most kids, isn’t until somewhere around 4’9″ tall and age eight to twelve.

    The trouble is that parents tend to judge readiness by age, and the numbers are sobering: by some research, only a small fraction of eight-year-olds actually pass the seat-belt fit test, yet many are moved to a plain belt at that age anyway. A belt that doesn’t fit a small body isn’t a minor compromise — a lap belt that rides up onto the soft abdomen can cause severe internal injuries in a crash, and a shoulder belt across the neck gets tucked behind the back or under the arm, removing its protection entirely. Use the five-step test below instead of the calendar. And remember the last piece: children should ride in the back seat until at least age 13, where it’s meaningfully safer.

    The 5-Step Seat Belt Fit Test

    A child is ready to leave the booster only when all five are true:

    1. They sit all the way back against the vehicle seat.

    2. Their knees bend comfortably at the edge of the seat.

    3. The lap belt sits low across the upper thighs/hips — not the belly.

    4. The shoulder belt crosses the center of the chest and shoulder — not the neck or face.

    5. They can stay seated like this comfortably for the whole ride.

    The Quieter Mistakes That Add Up

    Beyond the big six, a handful of less-obvious errors deserve a quick check:

    Wrong recline angle (rear-facing). A rear-facing seat that’s too upright can let a young baby’s head slump forward and compromise their airway. Use the seat’s built-in angle indicator or level line, and adjust until it’s within range — this is set incorrectly surprisingly often.

    Expired or secondhand seats. Car seats have expiration dates (commonly six to ten years from manufacture — check the label on the shell), because plastics degrade and standards evolve. Avoid used seats unless you know their full history; a seat that’s been in a crash, even one that looks perfect, may be compromised.

    Aftermarket accessories. Strap covers, head positioners, buckle guards, and seat protectors that didn’t come with your seat aren’t crash-tested with it and can interfere with how it performs. Skip anything not made or approved for your specific model.

    Replacing after a crash. After a moderate or severe crash, replace the seat — and check your manual, since some manufacturers advise replacement after any crash at all. NHTSA does define narrow “minor crash” criteria under which a seat may be reused, but when in doubt, replace it.

    Not registering for recalls. Register your seat with the manufacturer (or at NHTSA) so you’re notified if it’s ever recalled. It takes two minutes and is the only way you’ll reliably hear about a safety defect.

    The “Looks Fine” Assumption The Real Check
    “It feels tight enough” Less than 1 inch of movement at the belt path
    “She’s two, time to face forward” Rear-facing until the seat’s height/weight max
    “The straps look snug” Pinch test: no webbing can be pinched at the shoulder
    “He’s cozy in his winter coat” Buckle in regular clothes; coat goes over the harness
    “The clip’s on his chest” Chest clip exactly at armpit level
    “She’s big enough for the seat belt” She passes all five steps of the fit test

    The One Move That Catches Them All

    You don’t have to diagnose all of this alone. The most reliable way to find the mistakes you don’t know you’re making is to have your seat checked by a Certified Child Passenger Safety Technician (CPST) — a trained expert who will go over the installation, belt path, recline angle, harness fit, chest-clip position, and tether, and show you how to correct anything that’s off. These inspections are widely available and very often free, and NHTSA maintains a directory of inspection stations on its website. The most telling part of the experience is almost universal: even parents who were completely certain they’d done everything right walk away having fixed at least one thing.

    That’s not a knock on those parents — it’s the whole point. Car seats are hard, the errors are invisible, and certainty is no protection against a mistake you can’t see. A twenty-minute check is the cheapest insurance there is for the most precious passenger you’ll ever carry.

    Check the Seat You’re Sure Is Fine

    If there’s one idea to take from all of this, it’s that confidence and correctness are not the same thing. The seat that looks perfect, feels tight, and has your child happily buckled inside can still be making one of these quiet mistakes — and you’d never know from the back seat. So go look, tonight: pull the seat at the belt path and feel for that inch of movement, run the pinch test, slide the chest clip up to the armpits, and ask whether your child really needs to face forward or sit on a plain seat belt yet.

    Then, when you can, get those few minutes with a certified technician and let an expert catch what you can’t. None of this requires being a perfect parent. It just requires the humility to check — and the willingness to fix the one small thing that turns a seat that looks safe into a seat that is.

    The most dangerous mistake is the one you’re sure you didn’t make.

    This article is for general educational purposes and doesn’t replace your car seat and vehicle manuals or professional inspection. For authoritative, model-specific guidance, see NHTSA’s car seats and booster seats resources and its installation tips, and always follow the instructions for your specific seat.

  • Defensive Driving for People Who Already Think They’re Good

    Defensive Driving for People Who Already Think They’re Good

    Ask a room full of drivers to rate their own skill, and almost all of them will put themselves above average. It’s one of the most reliably documented quirks in psychology — and statistically, of course, it’s impossible. We can’t all be better than most of us. That gap between how good we think we are and how we actually drive isn’t harmless, either. The AAA Foundation for Traffic Safety has found that around 87% of drivers admit to at least one risky behavior behind the wheel in a given month — even while overwhelmingly agreeing those same behaviors are dangerous. So this article isn’t for “bad drivers.” It’s for the confident ones, the experienced ones, the people sure they’ve got this. Because the most dangerous driver on the road isn’t the nervous beginner. It’s the veteran who stopped questioning their own habits years ago.

    Here’s the uncomfortable framing worth sitting with: defensive driving is not a remedial course for people who are bad at driving. It’s the actual discipline that good drivers practice — the difference between someone who has simply avoided a crash so far and someone who is actively, continuously lowering their odds of one. Roughly 39,000 to 41,000 people die on U.S. roads every year, and the overwhelming majority of those crashes trace back not to a lack of raw skill but to lapses in attention, judgment, and habit. Skill isn’t what keeps you alive out there. Discipline is. Let’s talk about what that discipline actually looks like.

    The Confidence Trap

    The trouble with being a competent, experienced driver is that competence breeds autopilot. Once driving feels effortless, your brain starts treating it as a background task — something it can do while also planning dinner, rehearsing an argument, or glancing at a phone. That feeling of ease is precisely the danger. The skill that lets you drive without conscious effort is the same skill that lets you drive without conscious attention, and attention is the thing crashes are made of.

    The data on this is almost funny, in a grim way. Drivers know exactly what’s dangerous and do it anyway. In the AAA Foundation’s surveys, drivers overwhelmingly rate drowsy driving as very or extremely dangerous — and then about one in five admit to having done it in the past month. Nearly half admit to speeding. More than a third admit to reading texts or emails while driving. This isn’t ignorance; it’s a disconnect between what we believe about risk and how we behave, powered by a quiet certainty that the rules are really about other people, the genuinely bad drivers out there. The first act of defensive driving is admitting you’re not exempt from that pattern. You’re in it, like everyone else.

    What Defensive Driving Actually Means

    Defensive driving has an image problem. People hear it and picture someone timid — crawling along, brake lights flickering, holding up traffic. That’s not it at all. Real defensive driving is the opposite of timid; it’s alert and deliberate. The core of it is a single mental shift: you stop assuming everyone else will do the right thing, and start driving as though any of them might do the wrong thing at any moment. The car waiting to turn might pull out in front of you. The driver beside you might drift into your lane. The light that’s green for you means nothing about whether the cross traffic is actually stopping.

    You cannot control any of those other drivers. What you can control is your own position, your speed, and your attention — and defensive driving is simply the practice of managing those three things so that other people’s mistakes can’t reach you. The recurring theme, the one every other technique flows from, is this: always leave yourself an out. A space to brake into, a lane to move toward, a gap you’ve preserved on purpose. Good drivers don’t just react well to emergencies. They arrange their driving so that fewer situations ever become emergencies in the first place.

    The First Skill: Look Far Ahead, and Keep Your Eyes Moving

    Most drivers stare at the bumper directly in front of them. Skilled defensive drivers aim their eyes high and far — scanning the road ten to fifteen seconds ahead of where they are, which in city driving is a block or more, and on the highway is a quarter-mile out. Looking that far ahead is what buys you time. You see the brake lights cascading before they reach you, the merging truck before it merges, the pedestrian stepping off the curb while you still have room to react gently instead of violently.

    Pair that long view with eyes that never settle. Keep them moving in a constant loop — far ahead, near, mirrors, instruments, and back out — rather than fixating on any one thing. Driving instructors often frame this as a continuous cycle: scan the scene, identify what matters, predict what those things might do, decide your response, and execute it — then immediately start the loop again. Check your mirrors every several seconds so you always know what’s beside and behind you, not just ahead. A driver who knows where everything around them is, at all times, has already solved most of the problems a crash is built from.

    The Space Cushion: Following Distance

    If there’s one habit that separates the genuinely safe from the merely lucky, it’s following distance. Tailgating — even at a distance that feels normal — removes the one thing you most need in an emergency: time. The standard guideline is the three-second rule. Pick a fixed object ahead, like a sign or an overpass. When the vehicle in front of you passes it, start counting: “one-one-thousand, two-one-thousand, three-one-thousand.” If you reach that object before you finish counting, you’re following too closely — back off until you don’t.

    Three seconds is the dry-pavement minimum, not a target. In rain, fog, snow, heavy traffic, or at night, double it to four, five, or six seconds and more — your stopping distance grows dramatically when traction or visibility drops. This matters because of physics that no amount of skill can override. Your total stopping distance is your reaction distance (how far you travel before you even hit the brake) plus your braking distance (how far the car travels while stopping) — and both of those grow as speed increases. The faster you go, the more road you need, and the less of it a tailgater leaves themselves. A bigger cushion is the cheapest insurance on the road.

    The Three-Second Rule

    How: When the car ahead passes a fixed point, count “one-one-thousand, two-one-thousand, three-one-thousand.” Reach the point before you finish? Too close.

    When to extend it: Double to 4–6+ seconds in rain, snow, fog, darkness, heavy traffic, or when being tailgated yourself (so you can brake gradually instead of hard).

    Distraction Catches the Good Ones Too

    Here’s where confidence does its worst damage, because the better you think you are, the more you believe you can safely split your attention. You can’t — nobody can. Distracted driving killed 3,208 people in 2024, and the most quoted statistic in road safety is quoted so often because it’s so stark: sending or reading a text takes your eyes off the road for about five seconds, and at 55 mph that’s like driving the length of an entire football field with your eyes closed. No reflexes save you from what you never saw.

    Distraction comes in three flavors — taking your eyes off the road, your hands off the wheel, or your mind off the task — and texting manages all three at once. The trap for skilled drivers is the belief that hands-free fixes it. It doesn’t. Hands-free devices remove the manual and some of the visual distraction but leave the cognitive one fully intact: your mind is still on the conversation, not the road, and your brain doesn’t actually process the driving scene the way it should. The honest move isn’t to multitask better. It’s to put the phone where you can’t reach it — in the glovebox, on Do Not Disturb, out of the conversation entirely — and let driving have your whole mind.

    Speed and the Limits You Can’t Argue With

    Speeding is the confident driver’s signature move, justified by exactly the skill they’re proud of: I can handle it. And maybe you can handle the car — right up until the moment something unexpected happens, which is the only moment that counts. Speeding is a factor in about 29% of all traffic fatalities — close to a third — and the reason is pure physics, indifferent to your talent. Higher speed steals the reaction time you’d need to avoid a hazard, lengthens your stopping distance, and multiplies the energy in a crash, so the same impact becomes far more likely to kill.

    Defensive driving means treating the posted limit as a ceiling for ideal conditions, then driving to the actual conditions — slower in rain, fog, heavy traffic, construction, or unfamiliar roads, regardless of what the sign allows. It also means matching the flow of traffic rather than weaving through it; a car moving much faster or slower than everyone else is the one creating risk. The skilled response to a road full of variables isn’t to push your speed to the edge of your ability. It’s to keep enough margin that the unexpected stays survivable.

    The Impairments You Talk Yourself Into

    Everyone knows not to drive drunk, and alcohol still factors into thousands of deaths a year — but the impairment confident drivers most often rationalize is fatigue. Drowsy driving feels manageable in a way that being drunk doesn’t; you tell yourself you’ll push through the last hour, crack a window, turn up the music. The AAA Foundation estimates drowsy driving plays a role in hundreds of thousands of crashes annually, including thousands of fatal ones, and the mechanism is brutal: a drowsy brain can slip into “microsleeps” of a few seconds without your permission or awareness — the same eyes-closed-on-the-highway scenario as texting, except you don’t even know it’s happening.

    You cannot will yourself alert, and the tricks don’t work — cold air and loud music buy you minutes at most. The only real fix for drowsiness is sleep. If you’re fighting to keep your eyes open, drifting in your lane, or missing exits, the defensive move is to stop: pull off somewhere safe for a short nap, swap drivers, or call it for the night. The same humility applies to driving on medications that warn against it, or after any substance that slows your reactions. “I’m probably fine” is the exact thought that precedes a lot of crashes.

    The Overconfident Move The Defensive Move
    “I can text at a red light / quick glance” Phone out of reach, on Do Not Disturb, full stop
    Following close to keep pace Three-second cushion, doubled in bad conditions
    Eyes on the car right ahead Scanning 10–15 seconds ahead, mirrors every few seconds
    “I drive better a little over the limit” Speed set to conditions, matching traffic flow
    “I’ll push through, I’m almost home” Pull over and rest; tired brains microsleep

    Buckle Up — Yes, Even You

    It’s the simplest, most proven safety step there is, and confident drivers still skip it on the short trips because they trust their own control. But your seat belt isn’t protection against your mistakes — it’s protection against everyone else’s, and against the physics of a sudden stop. Of the passenger-vehicle occupants killed on U.S. roads in a recent year, roughly 44% were not wearing a seat belt, even though belt use nationwide sits above 90%. That overrepresentation tells the story: the unbelted minority makes up a wildly outsized share of the dead.

    The reason is largely ejection. In a serious crash, an unbelted occupant becomes a projectile, and being thrown from a vehicle is one of the most lethal things that can happen to a person — the large majority of people totally ejected are killed. Seat belts are overwhelmingly effective at preventing that ejection in the first place. No skill you possess changes what happens to an unbelted body in a 50-mph collision. Two seconds and a click is the highest-return habit in this entire article.

    The Humble Driver Is the Skilled Driver

    Notice the thread running through every technique here: none of them is about car-handling talent. Looking far ahead, keeping a cushion, killing distraction, respecting speed and fatigue, wearing the belt — these are habits of attention and humility, not feats of skill. That’s the real lesson hiding inside the joke about everyone thinking they’re above average. The drivers who are genuinely safest aren’t the ones most confident in their abilities. They’re the ones who never quite trust the road, who assume they can be surprised at any moment, and who build that assumption into how they drive.

    You probably are a good driver. That’s exactly why this matters: good drivers have the most to gain from staying humble and the most to lose from coasting on their reputation. Defensive driving isn’t a skill level you graduate past. It’s a mindset you renew every time you turn the key.

    Drive Like You Can Still Be Surprised

    The point was never that you’re a bad driver. It’s that confidence is the thing that quietly erodes the habits keeping you safe — and the only antidote is to keep questioning yourself. Look farther ahead than feels necessary. Leave more space than feels needed. Put the phone away even on the empty road. Slow down for the conditions, rest when you’re tired, and buckle up every single time, no exceptions for the quick trip.

    None of it requires more talent than you already have. It just requires the humility to admit that talent isn’t what’s been keeping you alive out there — attention and margin are. Assume the other driver will make the mistake, and always leave yourself an out. That’s the whole game, and the best drivers play it on every trip, no matter how many years they’ve been behind the wheel.

    The safest driver isn’t the one who’s sure. It’s the one who’s paying attention.

    This article is for general educational purposes. For authoritative data and guidance, see the National Highway Traffic Safety Administration and the AAA Foundation for Traffic Safety. Always follow the traffic laws and conditions where you drive.